Friday, January 29, 2016

Free Pattern Friday: Key Amigurumi

It's Friday, so here's a pattern. It's a 9" long amigurumi of a key. The pattern is written below. If you have any questions, feel free to email me at icrochetthings@gmail.com.

So this isn't going up on Ravelry because it's really lame and I don't want lame patterns on Ravelry. This thing only exists because I was practicing making ring shapes a few years ago. I had something unexpected come up yesterday so I didn't have time to prepare a better pattern. I've also been working on my big project, which is FINALLY finished. My god. So that will be uploaded this week if everything goes smoothly. 9 patterns total. My thumb hurts. TGIF.


Materials:
▪  Worsted weight yarn in yellow
▪  F hook (3.75 mm)
▪  Stuffing
▪  Scissors
▪  Tapestry needle

Difficulty: Easy

You should know how to work in the round, increase, decrease, and work in the back loops.


Pattern:

This is an icrochetthings original pattern © 2014-2016. Do not claim as your own. Do not copy, sell, or distribute this pattern. Do not sell any products made from this pattern.

Ring
Starting with yellow

1.  ch 24, ss in 1st ch to form a ring  (24)
2.  [3 sc, inc] around  (30)
3.  [4 sc, inc] around  (36)
4.  [5 sc, inc] around  (42)
5 – 8.  [sc] around  (42)
9.  [5 sc, dec] around  (36)
10.  [4 sc, dec] around  (30)
11.  [3 sc, dec] around  (24)

F/O, leave long tail for sewing, sew shut while stuffing

Long Cylinder
Starting with yellow

1.  ch 2, 6 sc in 1st ch  (6)
2.  [inc] around  (12)
3.  [BLO: sc] around  (12)
4 – 21.  [sc] around  (12)

F/O, leave long tail for sewing, and stuff

2 Short Cylinders
Starting with yellow

1.  ch 2, 5 sc in 1st ch  (5)
2.  [inc] around  (10)
3.  [BLO: sc] around  (10)
4 – 9.  [sc] around  (10)

F/O, leave long tail for sewing


Assembly
See pictures above if you need help with placement

  Sew the long cylinder onto the ring
  Sew the two short cylinders onto the end of the long one, stuffing as you go

Friday, January 22, 2016

Free Pattern Friday: British Royal Guard Amigurumi

Welcome to this week's Free Pattern Friday! Here we have a 7" tall amigurumi of a member of the British Royal Guard. The pattern is available on Ravelry or you can find it written below. If you have any questions, feel free to email me at icrochetthings@gmail.com.

Okay, I'm starting with this: I don't like this thing. I made it at least 3 years ago and therefore it's not at all up to my standards. I made some stupid decisions on how to make the pattern. The gloves and the arms aren't one piece, which is baffling to me why I would do that, plus the body goes to 33 stitches around and not 36. Why? I don't know. Just goes to show that practice makes perfect, and your beginning pieces certainly won't be.

If I were to make this now, I would certainly modify the body to make it more in proportion (though some people may like the chubby look), make the gloves and arms in one piece, redo the pattern of the feet, and use felt for the buttons instead of yarn. You can hardly even see them. I might also add a mouth, a chin strap for the hat, and maybe some cute rosy cheeks. Geez, now I really want to redo it, but I have so much other stuff I want to get done first. My big project is still in progress, I had to scrap about half of all the amigurumi because I decided the eyes and arms weren't right. What I don't do for my perfectionism. :P

TGIF and happy crocheting!

Materials:
▪  Worsted weight yarn in red, black, beige, white, dark brown
▪  F hook (3.75 mm)
▪  Stuffing
▪  6 mm safety eyes
▪  Scissors
▪  Tapestry needle
▪  Slicker brush

Difficulty: Easy
You should know how to work in the round, increase, decrease, and change colors.


Pattern:

This is an icrochetthings original pattern © 2014-2016. Do not claim as your own. Do not copy, sell, or distribute this pattern. Do not sell any products made from this pattern.

Head
Starting with beige
1.  ch 2, 6 sc in 1st ch  (6)
2.  [inc] around  (12)
3.  [sc, inc] around  (18)
4.  [2 sc, inc] around  (24)
5.  [3 sc, inc] around  (30)
6.  [4 sc, inc] around  (36)
7 – 11.  [sc] around  (36)
12.  [4 sc, dec] around  (30)
13.  [3 sc, dec] around  (24)
14.  [2 sc, dec] around  (18)
Stuff and attach safety eyes (I placed mine between rounds 9 and 10 at about 6 sts apart)
15.  [sc, dec] around  (12)
16.  [dec] around  (6)
F/O, sew shut

Hat
Starting with black

1.  ch 2, 6 sc in 1st ch  (6)
2.  [inc] around  (12)
3.  [sc, inc] around  (18)
4.  [2 sc, inc] around  (24)
5.  [3 sc, inc] around  (30)
6.  [4 sc, inc] around  (36)
7 – 12.  [sc] around  (36)

F/O, leave long tail for sewing

Nose
Starting with beige

1.  ch 2, 3 sc in 1st ch  (3)
2.  [inc] around  (6)


F/O, leave long tail for sewing

2 Sideburns
Starting with dark brown

1.  ch 4, [sc] across  (3)

F/O, leave long tail for sewing

Body
Starting with black

1.  ch 2, 6 sc in 1st ch  (6)
2.  [inc] around  (12)
3.  [sc, inc] around  (18)
4.  [2 sc, inc] around  (24)
5.  [3 sc, inc] around  (30) – Break off black
6.  Attach red – [9 sc, inc] around  (33)
7.  [sc] around  (33) – Break off red
8.  Attach white –  [sc] around  (33) – Break off white
9.  Attach red – [sc] around  (33)
10.  [9 sc, dec] around  (30)
11.  [3 sc, dec] around  (24)
12.  [2 sc, dec] around  (18) – Break off red
Stuff
13. Attach black – [sc, dec] around  (12)

F/O, leave long tail for sewing

2 Gloves
Starting with white

1.  ch 2, 6 sc in 1st ch  (6)
2 – 3.  [sc] around  (6)

F/O, leave long tail for sewing

2 Arms
Starting with red
1.  ch 2, 6 sc in 1st ch  (6)
2 – 8.  [sc] around  (6)

F/O, leave long tail for sewing

2 Feet
Starting with black

1.  ch 2, 6 sc in 1st ch  (6)
2.  [inc] around  (12)

F/O, leave long tail for sewing


Assembly
See pictures above if you need help with placement

  Sew the head onto the top of the body
▪  Sew the gloves onto the arms
▪  Sew the arms on either side of the body
▪  Sew the feet onto the bottom of the body
▪  Sew the hat onto the top of the head
▪  Sew the side burns on either side of the head
▪  Use white yarn to embroider the details onto the body
▪  Use the slicker brush to gently brush the hat

Friday, January 15, 2016

Free Pattern Friday: Tonkatsu Amigurumi

This week's Free Pattern Friday is an amigurumi of the character "Tonkatsu" from San-X. It measures approximately 3" tall. The pattern is available on Ravelry or you can find it written below. If you have any questions, feel free to email me at icrochetthings@gmail.com.

First off, this is Tonkatsu


I think the gist of this character is that he is based on a Japanese meat dish where he is essentially the "crust" that no one wants to eat, come to life. Poor little guy. I've been a little obsessed with him since I got a plush of him for Christmas. He is so simple but so cute! He is part of a series of characters so hopefully I will get around to making the rest of them, but I'll probably get distracted. I also thought of the idea of adding some teeth, ears, and a tail to turn him into a groundhog for Groundhog's Day coming up (I freaking love groundhogs, you have no idea).


I'm working on a big crochet project right now which is a series of 9 related patterns. The first pattern should be up sometime this week. I'm super excited to upload them, they're really cute. :)


Materials:

▪  Worsted weight yarn in brown, pink
▪  E hook (3.50 mm)
▪  Stuffing
▪  6 mm safety eyes
▪  Scissors
▪  Tapestry needle
▪  Slicker brush

Difficulty: Easy

You should know how to work in the round, increase, and decrease.


Pattern:

This is an icrochetthings original pattern © 2014-2016. Do not claim as your own. Do not copy, sell, or distribute this pattern. Do not sell any products made from this pattern. Tonkatsu belongs to San-X.


Body
Starting with brown

1.  ch 2, 6 sc in 1st ch  (6)

2.  [inc] around  (12)
3.  [sc, inc] around  (18)
4.  [2 sc, inc] around  (24)
5.  [3 sc, inc] around  (30)
6 – 7.  [sc] around  (30)
8.  [4 sc, inc] around  (36)
9 – 16.  [sc] around  (36)
17.  [4 sc, dec] around  (30)
18.  [3 sc, dec] around  (24)
Stuff and attach safety eyes (I placed mine between rounds 9 and 10 at about 7 sts apart)
19.  [2 sc, dec] around  (18)
20.  [sc, dec] around  (12)
21.  [dec] around  (6)

F/O, sew shut


2 Arms
Starting with brown

1.  ch 2, 6 sc in 1st ch  (6)

2.  [sc] around  (6)
3.  Fold in half and [sc] across  (3)

F/O, leave long tail for sewing


2 Feet
Starting with brown

1.  ch 2, 6 sc in 1st ch  (6)

2.  [sc] around  (6)
3.  [sc, inc] around  (9)
4.  Fold in half and [sc] across  (4)

F/O, leave long tail for sewing


Assembly
See pictures above if you need help with placement

▪  Use the slicker brush to gently brush the body
▪  Use pink yarn to embroider a nose onto the body
▪  Sew the arms onto the front of the body
▪  Sew the feet onto the bottom of the body
▪  Use the slicker brush to gently brush the arms and feet


Friday, January 8, 2016

Free Pattern Friday: Slowpoke Amigurumi


Welcome to Free Pattern Friday! This week's pattern is a 3" tall, 10" long amigurumi of a Slowpoke. The pattern is available on Ravelry or you can find it written below. If you have any questions, feel free to email me at icrochetthings@gmail.com.

Fun fact: My very first amigurumi pattern that I ever made by myself was a Slowpoke. This pattern is  basically a revamped version of my old one. 

Anywho, here's the new pattern:

Materials:
▪  Worsted weight yarn in pink, white, cream, brown
▪  Crochet thread in black
▪  E hook (3.50 mm)
▪  Stuffing
▪  6 mm safety eyes
▪  Scissors
▪  Tapestry needle


Difficulty: Easy
You should know how to work in the round, increase, decrease, and change colors.

Pattern:

This is an icrochetthings original pattern © 2014-2016. Do not claim as your own. Do not copy, sell, or distribute this pattern. Do not sell any products made from this pattern. Slowpoke belongs to Nintendo. 


2 Eye Patches
Starting with white

1.  ch 2, 6 sc in 1st ch  (6)
2.  [sc, inc] around  (9)

F/O, leave long tail for sewing

Head
Starting with pink

1.  ch 2, 6 sc in 1st ch  (6)
2.  [inc] around  (12)
3.  [sc, inc] around  (18)
4.  [2 sc, inc] around  (24)
5.  [3 sc, inc] around  (30)
6.  [4 sc, inc] around  (36)
7.  [sc] around  (36)
8.  [5 sc, inc] around  (42)
9 – 13.  [sc] around  (42)
14.  [5 sc, dec] around  (36)
15.  [4 sc, dec] around  (30)
16.  [3 sc, dec] around  (24)
Before attaching the safety eyes to the body, push the eyes through the center of the eye patches
Stuff and attach safety eyes (I placed mine between rounds 10 and 11 at about 8 sts apart)
17.  [2 sc, dec] around  (18)
18.  [sc, dec] around  (12)
19.  [dec] around  (6)

F/O, sew shut

2 Ears
Starting with pink

1.  ch 2, 6 sc in 1st ch  (6)
2.  [sc, inc] around  (9)
3 – 4.  [sc] around  (9)
5.  [sc, dec] around  (6)
Stuff

F/O, leave long tail for sewing, sew shut

Snout
Starting with cream

1.  ch 8, [sc] across, working on the opposite side of the chs: [sc] across  (14)
2.  [inc, 5 sc, inc] around  (18)
3.  [sc, inc, 6 sc, inc] around  (22)
4.  [2 sc, inc, 7 sc, inc] around  (26)
5 – 6.  [sc] around  (26)

F/O, leave long tail for sewing

Body
Starting with pink

1.  ch 2, 6 sc in 1st ch  (6)
2.  [inc] around  (12)
3.  [sc, inc] around  (18)
4.  [2 sc, inc] around  (24)
5.  [3 sc, inc] around  (30)
6.  [4 sc, inc] around  (36)
7 – 10.  [sc] around  (36)
11.  [4 sc, dec] around  (30)
12 – 14.  [sc] around  (30)
15.  [3 sc, dec] around  (24)
16 – 18.  [sc] around  (24)
Stuff

F/O, leave long tail for sewing

4 Legs
Starting with white

1.  ch 2, 6 sc in 1st ch  (6)
2.  [sc, inc] around  (9)
3.  [sc] around  (9) – Break off white
4.  Attach pink – [2 sc, inc] around  (12)
5 – 7.  [sc] around  (12)

F/O, leave long tail for sewing

Tail
Starting with white

1.  ch 2, 6 sc in 1st ch  (6)
2.  [sc, inc] around  (9)
3 – 5.  [sc] around  (9) – Break off white
6.  Attach pink – 3 sc, dec, 3 sc, inc  (9)
7.  [sc] around  (9)
8.  3 sc, dec, 3 sc, inc  (9)
9 – 10.  [sc] around  (9)
11.  3 sc, dec, 3 sc, inc  (9)
12.  [sc] around  (9)
13.  [2 sc, inc] around  (12)
14.  5 sc, dec, 4 sc, inc  (12)
15.  [sc] around  (12)
Stuff

F/O, leave long tail for sewing


Assembly
See pictures above if you need help with placement

▪  Sew the eye patches onto the head
▪  Sew the snout onto the head, stuffing as you go
▪  Use brown yarn to embroider nostrils onto the snout
▪  Use black crochet thread to embroider a swirl onto each ear
▪  Sew the ears on either side of the head
▪  Sew the body onto the back of the head
▪  Sew the tail onto the back of the body
▪  Sew two legs on either side of the body, stuffing as you go

Thursday, January 7, 2016

Pattern: Rilakkuma Bear Amigurumi

A 6" tall amigurumi of Rilakkuma from San-X. The pattern is available on Ravelry and on Etsy. If you have any questions, feel free to email me at icrochetthings@gmail.com.

I absolutely love all the characters from San-X; they're so cute and perfect for crocheting! I would love to make the rest of them eventually. I need to make this one in the other bear's colors too, Korilakkuma.

Happy Thursday and Free Pattern Friday will be up tomorrow!

Friday, January 1, 2016

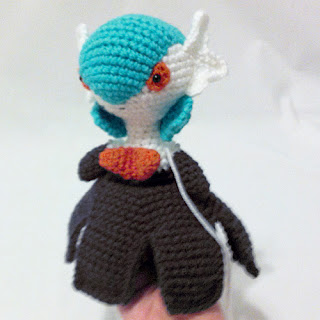
Pattern: Mega Gardevoir Amigurumi

An 8" tall amigurumi of a Mega Gardevoir. The pattern is available on Ravelry and on Etsy. If you have any questions, feel free to email me at icrochetthings@gmail.com.

Oh my god, it's been waaaaay too long since I uploaded a pattern. But it's New Year's Resolution time so here we go. I made this one earlier last year at the request of a customer. She does have legs (though they're hidden under the skirt) so it can stand up, but you have to have the skirt and legs at the perfect placement for it to stand freely. Here is the shiny version that I made for the customer. I really like the shiny colors, probably more so than the original. I think in the shiny version I put a small mouth on it, but in this pattern I took the mouth out.


Anyway, icrochetthings is back on the top of my priority list. I have so many patterns that I had written up but never posted. Free Pattern Fridays are back on as well. Happy New Year and here's to a great 2016. Happy crocheting! :)